WHAT'S NEW?
Loading...

Encryption is the process of encoding messages or information in such a way that only authorized parties can read it. Encryption does not of itself prevent interception, but denies the message content to the interceptor. In an encryption scheme, the intended communication information or message, referred to as plaintext, is encrypted using an encryption algorithm, generating ciphertext that can only be read if decrypted. For technical reasons, an encryption scheme usually uses a pseudo-random encryption key generated by an algorithm. It is in principle possible to decrypt the message without possessing the key, but, for a well-designed encryption scheme, large computational resources and skill are required. An authorized recipient can easily decrypt the message with the key provided by the originator to recipients, but not to unauthorized interceptors.

In many other web languages such as php, encryption can easily done and designer can easily display his attribute in footer, but, in the case of Blogger; its difficult. Reason is crystal clear, because Blogger template made in only few basic languages such as HTML, CSS, JavaScript and so forth. So, encryption in Blogger templates can only possible with JavaScript, but how to encrypt Blogger Templates?

Why this Script is Better then other any?

First of all, there is only a single script over web, that is stolen from Templateism from his Google Code's directory. However, there are lots of flow in that Script. Such as, it can be easily removable with simple CSS code (Can't mention here). Secondly, It is run only with JQuery 1.11.0, So sometimes it cause incompatibility error, that is probably not fine at all. Moreover, that Script is bit complex and only developers can handle, where as, this Script is very simple and understandable for newbie too. The crux of the content is that there are ample number of pros in this new Encryption Script.
Make sure, this is script is original written by me - Harman Singh Hira, so copying and pasting without mention me or my blog is prohibited. You must mention this blog before posting or using this script.
Features:
  • Hard to Decrypt
  • Hard to Remove
  • Simple and Clean Codes
  • Run without JQuery
  • Written in JavaScript only
  • No Compatibility Issue
  • Best for Newbies
  • Usable for outside Blogger too.
  • Many more... 
How to Encrypt Blogger Templates?
Note: Before doing anything, keep a backup of your template as a precaution.

#01: Search for a JavaScript Codes in between a Blogger Template. You can use Search tool for it. Select large-big and unique JavaScript Codes for better encryption so that if codes remove from template then template stop working.


#02: After Selection, Copy below codes.
var DesignDevta_Site = "http://site.in";
var DesignDevta_Credits = "Designed by <a href='http://site.in'>Design Devta</a>";
var DD_Encryption=["\x30\x2E\x36\x3D\x39\x28\x29\x7B\x61\x20\x65\x3D\x34\x2E\x35\x28\x22\x64\x22\x29\x3B\x37\x3D\x3D\x65\x26\x26\x28\x30\x2E\x38\x2E\x31\x3D\x32\x29\x2C\x65\x2E\x62\x28\x22\x31\x22\x2C\x32\x29\x2C\x65\x2E\x63\x3D\x33\x7D\x3B","\x7C","\x73\x70\x6C\x69\x74","\x77\x69\x6E\x64\x6F\x77\x7C\x68\x72\x65\x66\x7C\x44\x65\x73\x69\x67\x6E\x44\x65\x76\x74\x61\x5F\x53\x69\x74\x65\x7C\x44\x65\x73\x69\x67\x6E\x44\x65\x76\x74\x61\x5F\x43\x72\x65\x64\x69\x74\x73\x7C\x64\x6F\x63\x75\x6D\x65\x6E\x74\x7C\x67\x65\x74\x45\x6C\x65\x6D\x65\x6E\x74\x42\x79\x49\x64\x7C\x6F\x6E\x6C\x6F\x61\x64\x7C\x6E\x75\x6C\x6C\x7C\x6C\x6F\x63\x61\x74\x69\x6F\x6E\x7C\x66\x75\x6E\x63\x74\x69\x6F\x6E\x7C\x76\x61\x72\x7C\x73\x65\x74\x41\x74\x74\x72\x69\x62\x75\x74\x65\x7C\x69\x6E\x6E\x65\x72\x48\x54\x4D\x4C\x7C\x44\x44\x5F\x45\x6E\x63\x72\x79\x70\x74\x69\x6F\x6E\x7C","\x72\x65\x70\x6C\x61\x63\x65","","\x5C\x77\x2B","\x5C\x62","\x67"];
eval(function(_0x6600x1,_0x6600x2,_0x6600x3,_0x6600x4,_0x6600x5,_0x6600x6){_0x6600x5=function(_0x6600x3){return _0x6600x3.toString(_0x6600x2)};if(!DD_Encryption[5][DD_Encryption[4]](/^/,String)){while(_0x6600x3--){_0x6600x6[_0x6600x5(_0x6600x3)]=_0x6600x4[_0x6600x3]||_0x6600x5(_0x6600x3)};_0x6600x4=[function(_0x6600x5){return _0x6600x6[_0x6600x5]}];_0x6600x5=function(){return DD_Encryption[6]};_0x6600x3=1;};while(_0x6600x3--){if(_0x6600x4[_0x6600x3]){_0x6600x1=_0x6600x1[DD_Encryption[4]]( new RegExp(DD_Encryption[7]+_0x6600x5(_0x6600x3)+DD_Encryption[7],DD_Encryption[8]),_0x6600x4[_0x6600x3])}};return _0x6600x1;}(DD_Encryption[0],15,15,DD_Encryption[3][DD_Encryption[2]](DD_Encryption[1]),0,{}));

#03: Paste them in between selected <script> tag. (before </script>)


#04: Edit Codes according to you. Such as, website and credit texts.

#05: Now copy complete JavaScript Codes. (without <script> tag)


#06: Paste Codes at: https://javascriptobfuscator.com/Javascript-Obfuscator.aspx

#07: Click on Obfuscate Button to Encrypt JavaScript.


#08: Copy Encrypted JavaScript and Paste in Blogger Template on the place of old codes (remove previous decoded codes)

Note: You can now Save your Template then open your blogger new tab. If your blog redirected to your wanted destination then it means codes are working.

#09: Now, its time to display credits in footer. First of all, select place where you ant to display them, probably footer.

#10: Remove existing credit codes with below cods.
<DesignDevta id="DD_Encryption"/>


#11: That's it. Done.

Thank you for patronizing Design Devta. I am sure your visit to us must be quite satisfying and in line with your expectations from us. Just in case, it's not as you expected from us or if you are facing any problem, kindly forward your feedback's directly to us by leave a Comment below or using our Contact form. And, get assured response from my side. Your feedback's and suggestions are extremely valuable to us. This Post is written by Harman Singh Hira. There is no any source so Copying or using this post for your own site is not allowed. If anyone do so get ready for facing DMCA. Please, if you like this post then share on your social networking sites. Assuring you of our best service always.
How To Schedule Emails In Gmail?

Gmail is a free, advertising-supported email service provided by Google. Users may access Gmail as secure webmail, as well as via POP3 or IMAP4 protocols. Gmail initially started as an invitation-only beta release on April 1, 2004 and it became available to the general public on February 7, 2007, though still in beta status at that time. The service was upgraded from beta status on July 7, 2009, along with the rest of the Google Apps suite.

With an initial storage capacity offer of 1 GB per user, Gmail significantly increased the webmail standard for free storage from the 2 to 4 MB its competitors such as Hotmail offered at that time. Individual Gmail messages, including attachments, may be up-to 25 MB. Gmail has a search-oriented interface and a "conversation view" similar to an Internet forum. Gmail is noted by web developers for its pioneering use of Ajax. Gmail runs on Google GFE/2.0 on Linux. As of June 2012, it was the most widely used web-based email provider with over 425 million active users worldwide. According to a 2014 estimate, 60% of mid-sized US companies were using Gmail. In May 2014, Gmail became the first app on the Google Play Store to hit one billion installations on Android devices.

Do you need to send Email at particular time but you can not able to manage send Email at that time? Or, you are looking for tool for schedule Gmail Email? Well, you are at right place. Due to advancements of twenty-first century, our life is become so busy that people have not time for their love ones. In this case, if you have job where Email is vital then of course you need a tool for scheduling Emails. So, today's our topic is on How To Schedule Emails In Gmail? Let's begin:

How To Schedule Emails In Gmail?

#1: Initially, You need to Install Boomeranggmail Extension for Google Chrome from their Website.

#2: Click on big red button named Add this to your Browser.

How To Schedule Emails In Gmail?

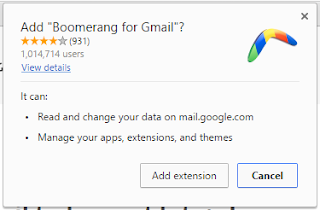
#3: Now, Add Extension

How To Schedule Emails In Gmail?

#4: Extension will be installed in your Browser. Now, Go to your Gmail and Sign in.

How To Schedule Emails In Gmail?

#5: Compose new Email.

#6: Now, you will saw a new tab just below Send Button, where you can manage schedule Emails.

How To Schedule Emails In Gmail?

#7: Done.

Thank you for patronizing Design Devta. I am sure your visit to us must be quite satisfying and in line with your expectations from us. Just in case, it's not as you expected from us or if you are facing any problem, kindly forward your feedback's directly to us by leave a Comment below or using our Contact form. And, get assured response from my side. Your feedback's and suggestions are extremely valuable to us. This Post is written by Harman Singh Hira. There is no any source so Copying or using this post for your own site is not allowed. If anyone do so get ready for facing DMCA. Please, if you like this post then share on your social networking sites. Assuring you of our best service always.

Facebook is a social networking service and website started in February 2004. It is owned byFacebook, Inc. As of September 2012, Facebook has over one billion active users. Users may make a personal profile, add other users as friends, and send messages. Facebook users must register before using the site. Users may join user groups. These groups can be for a workplace, school or college, or other interest. The name of the service comes from the name for the book given to students at the start of the school year by some universities in the United States. These books help students get to know each other better. Facebook allows any users who say they are at least 13 years old to become users of the website.

A one can send an instant Audio Clip to someone else in WhatsApp; we all know about that, but this feature is still not arrived in Facebook. If you want to send any audio file in Facebook then initially you need to open chat then full conversation and after that, attach audio file to send. This isn't so tough but not easy too. What if we can audio messages instantly like Whatsapp? Well, here i present a tutorial that How to Send Audio Messages in Facebook like Whatsapp. Let's begin:

How to Send Audio Messages in Facebook like Whatsapp?

#01: Log in to your Facebook and Click here

#02: Add an Extension in your Google Chrome Browser.

How to Send Audio Messages in Facebook like Whatsapp?

How to Send Audio Messages in Facebook like Whatsapp?

#03: Two new Tab will be opened.

#04: In first tab, Allow your Microphone for recording your Voice.

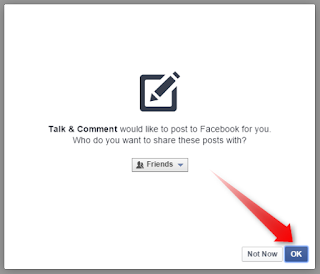
#05: In other tab, allow an app in your Facebook account. (Log in if required)

How to Send Audio Messages in Facebook like Whatsapp?

How to Send Audio Messages in Facebook like Whatsapp?

#06: Now, open any Chat or Message.

#07: There will be must a Mic Icon.

How to Send Audio Messages in Facebook like Whatsapp?

#08: Click on it and Speak whatever you want to send in Audio Message.

#09: Click on Stop and wait while Audio is uploading

How to Send Audio Messages in Facebook like Whatsapp?

#10: A link will be appeared after uploading done.

How to Send Audio Messages in Facebook like Whatsapp?

#11: Send that link. Don't worry, it will change to Audio player.

How to Send Audio Messages in Facebook like Whatsapp?

#12: Done

Thank you for patronizing Design Devta. I am sure your visit to us must be quite satisfying and in line with your expectations from us. Just in case, it's not as you expected from us or if you are facing any problem, kindly forward your feedback's directly to us by leave a Comment below or using our Contact form. And, get assured response from my side. Your feedback's and suggestions are extremely valuable to us. This Post is written by Harman Singh Hira. There is no any source so Copying or using this post for your own site is not allowed. If anyone do so get ready for facing DMCA. Please, if you like this post then share on your social networking sites. Assuring you of our best service always.

How to Download High Quality MP3 from YouTube?

YouTube is a free video sharing website that lets people upload, view, and share videos. Videos can be rated, and the number of times a video has been watched is put on the site. At the moment, Google (a search engine company) owns and operates YouTube. Many different types of videos can be put onto the website. YouTube was started in February 2005 by three former workers of PayPal

MPEG-1 or MPEG-2 Audio Layer III, more commonly referred to as MP3, is an audio coding format for digital audio which uses a form of lossy data compression. It is a common audio format for consumer audio streaming or storage, as well as a de facto standard of digital audio compression for the transfer and playback of music on most digital audio players.

The use of lossy compression is designed to greatly reduce the amount of data required to represent the audio recording and still sound like a faithful reproduction of the original uncompressed audio for most listeners. An MP3 file that is created using the setting of 128 kbit/s will result in a file that is about 1/11 the size of the CD file created from the original audio source (44,100 samples per second × 16 bits per sample × 2 channels = 1,411,200 bit/s; MP3 compressed at 128 kbit/s: 128,000 bit/s [1 k = 1,000, not 1024, because it is a bit rate]. Ratio: 1,411,200/128,000 = 11.025). An MP3 file can also be constructed at higher or lower bit rates, with higher or lower resulting quality.

Features:
  • Easy to use
  • Simple Site
  • Enable us to Download in High Quality MP3
  • Enable us to Download in High Defination MP4
  • Enable us to Download in various Video Format, like MP4, FLV, WEBM, 3GP
  • Enable us to Download in various Audio Format, like M4A. WEBM
  • Enable us to Download in various Video Format, like MP4, FLV, WEBM
  • Can download according to Size and Quality
  • Many More...


There are variety of websites those offer YouTube Video Conversion in various Format, such as MP4, FLV and so on, but if we talk about MP3 then almost all sites only enable us to download MP3 audio file of YouTube video in lower quality, usually 128 kbps. However, these all type of work is against YouTube policies. You can not legally download any video from YouTube. But, we are here to crack them. To download High Quality MP3, follow below steps:
Note: Make sure, downloading any YouTube video is against their policies so we are not at all responsible how you use this trick. This is up to you.

How to Download High Quality MP3 from YouTube?

#1: Go to a Site: www.ChangeToMp3.com

#2: Search for your Video or paste direct YouTube video link (In Search Box, blinking I will not be appeared)

How to Download High Quality MP3 from YouTube?

 #3: Now click on Download MP3 Button.

How to Download High Quality MP3 from YouTube?

#4: It will take few seconds for getting data. 

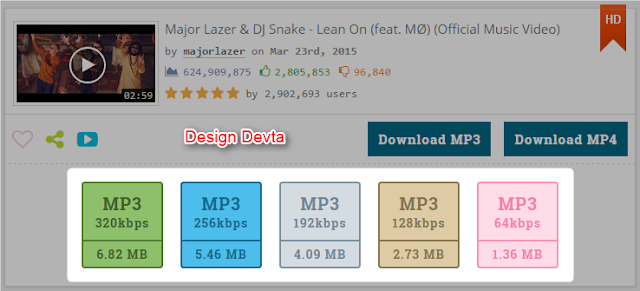
#5: Then Download MP3 according to your favorite size and quality. (Size may vary on each video)

How to Download High Quality MP3 from YouTube?

#6: You can also download HD Video of any video in any format by just clicking on Download MP4 even in various Audio Formats.

How to Download High Quality MP3 from YouTube?

#7: Done

Thank you for patronizing Design Devta. I am sure your visit to us must be quite satisfying and in line with your expectations from us. Just in case, it's not as you expected from us or if you are facing any problem, kindly forward your feedback's directly to us by leave a Comment below or using our Contact form. And, get assured response from my side. Your feedback's and suggestions are extremely valuable to us. This Post is written by Harman Singh Hira. There is no any source so Copying or using this post for your own site is not allowed. If anyone do so get ready for facing DMCA. Please, if you like this post then share on your social networking sites. Assuring you of our best service always.